학교 과제로 냈었던-_-a Java로 구현한 멀티쓰레드 웹서버입니다. Java로 구현할 수 있는 가장 기본적인 형태의 소켓 프로그래밍을 이용하여 구현하였습니다. 그냥 요청 받으면 해당 파일을 읽어서 내용을 보내는 단순한 어플리케이션입니다. Thread safe한 설계는 하지 않았습니다. 그냥 공부용으로만 사용해주세요.
* WebServer.java
class WebServer
{
    public static void main(String argv[]) throws Exception
    {
        // 서버소켓을 생성한다. 웹서버는 기본적으로 80번 포트를 사용한다.
        ServerSocket listenSocket = new ServerSocket(80);
        System.out.println("WebServer Socket Created");

        Socket connectionSocket;
        ServerThread serverThread;

        // 순환을 돌면서 클라이언트의 접속을 받는다.
        // accept()는 Blocking 메서드이다.
        while((connectionSocket = listenSocket.accept()) != null)
        {
            // 서버 쓰레드를 생성하여 실행한다.
            serverThread = new ServerThread(connectionSocket);
            serverThread.start();
        }
    }
}
* ServerThread.java
public class ServerThread extends Thread
{
  // 파일 요청이 없을 경우의 기본 파일
  private static final String DEFAULT_FILE_PATH = "index.html";

  // 클라이언트와의 접속 소켓
  private Socket connectionSocket;

  /**
   * <pre>
   * 기본 생성자
   * </pre>
   *
   * @param connectionSocket 클라이언트와의 통신을 위한 소켓
   */
  public ServerThread(Socket connectionSocket)
  {
    this.connectionSocket = connectionSocket;
  }

  /* (non-Javadoc)
   * @see java.lang.Thread#run()
   */
  @Override
  public void run()
  {
    System.out.println("WebServer Thread Created");
    BufferedReader inFromClient = null;
    DataOutputStream outToClient = null;

    try
    {
      // 클라이언트와 통신을 위한 입/출력 2개의 스트림을 생성한다.
      inFromClient = new BufferedReader(

            new InputStreamReader(connectionSocket.getInputStream()));
      outToClient = new DataOutputStream(
            connectionSocket.getOutputStream());

      // 클라이언트로의 메시지중 첫번째 줄을 읽어들인다.
      String requestMessageLine = inFromClient.readLine();

      // 파싱을 위한 토큰을 생성한다.
      StringTokenizer tokenizedLine = new StringTokenizer(
            requestMessageLine);

      // 첫번째 토큰이 GET으로 시작하는가? ex) GET /green.jpg
      if(tokenizedLine.nextToken().equals("GET"))
      {
        // 다음의 토큰은 파일명이다.
        String fileName = tokenizedLine.nextToken();

        // 기본적으로 루트(/)로부터 주소가 시작하므로 제거한다.
        if(fileName.startsWith("/") == true)
        {
          if(fileName.length() > 1)
          {
            fileName = fileName.substring(1);
          }
          // 파일명을 따로 입력하지 않았을 경우 기본 파일을 출력한다.
          else
          {
            fileName = DEFAULT_FILE_PATH;
          }
        }

        File file = new File(fileName);

        // 요청한 파일이 존재하는가?
        if(file.exists())
        {
          // 존재하는 파일의 MIME타입을 분석한다.
          String mimeType = new MimetypesFileTypeMap()
            .getContentType(file);

          // 파일의 바이트수를 찾아온다.
          int numOfBytes = (int) file.length();

          // 파일을 스트림을 읽어들일 준비를 한다.
          FileInputStream inFile = new FileInputStream(fileName);
          byte[] fileInBytes = new byte[numOfBytes];
          inFile.read(fileInBytes);

          // 정상적으로 처리가 되었음을 나타내는 200 코드를 출력한다.
          outToClient.writeBytes("HTTP/1.0 200 Document Follows \r\n");
          outToClient.writeBytes("Content-Type: " + mimeType + "\r\n");

          // 출력할 컨텐츠의 길이를 출력
          outToClient.writeBytes("Content-Length: " + numOfBytes + "\r\n");
          outToClient.writeBytes("\r\n");

          // 요청 파일을 출력한다.
          outToClient.write(fileInBytes, 0, numOfBytes);
        }
        else
        {
          // 파일이 존재하지 않는다는 에러인 404 에러를 출력하고 접속을 종료한다.
          System.out.println("Requested File Not Found : " + fileName);

          outToClient.writeBytes("HTTP/1.0 404 Not Found \r\n");
          outToClient.writeBytes("Connection: close\r\n");
          outToClient.writeBytes("\r\n");
        }
      }
      else
      {
        // 잘못된 요청임을 나타내는 400 에러를 출력하고 접속을 종료한다.
        System.out.println("Bad Request");

        outToClient.writeBytes("HTTP/1.0 400 Bad Request Message \r\n");
        outToClient.writeBytes("Connection: close\r\n");
        outToClient.writeBytes("\r\n");
      }

      connectionSocket.close();
      System.out.println("Connection Closed");
    }
    // 예외 처리
    catch(IOException ioe)
    {
      ioe.printStackTrace();
    }
  }
}
* index.html
<html>
<head>
<title>웹서버 테스트</title>
</head>
<body>
<p>http://theeye.pe.kr</p>
<img src="sooji.jpg" />
</body>
</html>
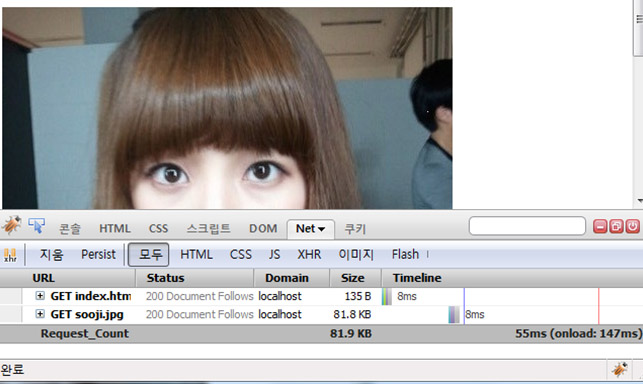
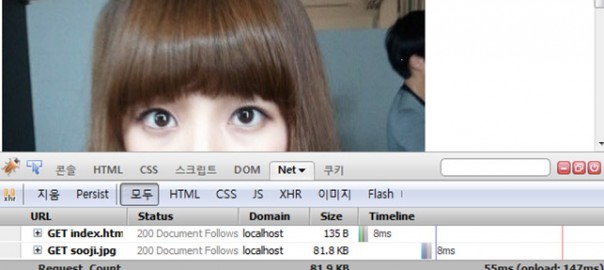
테스트를 해보니 정상적으로 파일을 전송하고 해당 html에 딸려있는 객체들역시 정상적으로 전송됨을 알 수 있습니다. 잘 되네요~^^b