2010년 2월 4일 추가 —-
이 기능은 잘 되지 않는것으로 판단됩니다. 자세한 부분은 댓글을 참고하세요.
리눅스의 사실상 기본 패키지인 iproute안에는 tc(Traffic Control)이라는 명령어가 포함되어 있습니다.
이 명령어를 사용하여 네트워크 스위치의 도움 없이도 자체적으로 자신의 이더넷 속도를 제한 할 수 있습니다.
이는 보통 네트워크에서 말하는 QOS(Quality Of Service)와 비슷한 기능을 제공합니다.
하지만 저비용으로 고효율을 낼 수 있다는 점에서 매우 괜찮은 방법인듯 합니다.
1) 요구 사항
– iproute RPM 패키지가 설치되어있어야 함
– 리눅스 커널의 iproute 파트의 Traffic Control 옵션(Netlink포함)이 활성화 되어있어야 함.
– 리눅스 커널 2.4버젼 이후의 경우 기본적으로 대부분의 Traffic Control 옵션이 활성화 되어있음.
2) 시스템 명령어 추가
– shaping이라는 명령을 추가합니다.
[code]$ vi /etc/init.d/shaping[/code]
– 다음의 소스코드를 입력합니다.
[code]#!/bin/bash
# tc uses the following units when passed as a parameter.
# kbps: Kilobytes per second
# mbps: Megabytes per second
# kbit: Kilobits per second
# mbit: Megabits per second
# bps: Bytes per second
# Amounts of data can be specified in:
# kb or k: Kilobytes
# mb or m: Megabytes
# mbit: Megabits
# kbit: Kilobits
# To get the byte figure from bits, divide the number by 8 bit
#
# tc명령어의 위치를 입력합니다.
TC=/sbin/tc
# 대역폭을 제한하기 위한 이더넷 인터페이스를 지정합니다.
IF=eth0
# 다운로드 속도 제한
DNLD=15mbit
# 업로드 속도 제한
UPLD=15mbit
# 속도 제한을 적용할 호스트의 IP 주소
IP=123.123.123.123
# Filter options for limiting the intended interface.
U32=”$TC filter add dev $IF protocol ip parent 1:0 prio 1 u32″
start() {
# We’ll use Hierarchical Token Bucket (HTB) to shape bandwidth.
# For detailed configuration options, please consult Linux man
# page.
$TC qdisc add dev $IF root handle 1: htb default 30
$TC class add dev $IF parent 1: classid 1:1 htb rate $DNLD
$TC class add dev $IF parent 1: classid 1:2 htb rate $UPLD
$U32 match ip dst $IP/32 flowid 1:1
$U32 match ip src $IP/32 flowid 1:2
# The first line creates the root qdisc, and the next two lines
# create two child qdisc that are to be used to shape download
# and upload bandwidth.
#
# The 4th and 5th line creates the filter to match the interface.
# The ‘dst’ IP address is used to limit download speed, and the
# ‘src’ IP address is used to limit upload speed.
}
stop() {
# Stop the bandwidth shaping.
$TC qdisc del dev $IF root
}
restart() {
# Self-explanatory.
stop
sleep 1
start
}
show() {
# Display status of traffic control status.
$TC -s qdisc ls dev $IF
}
case “$1” in
start)
echo -n “Starting bandwidth shaping: “
start
echo “done”
;;
stop)
echo -n “Stopping bandwidth shaping: “
stop
echo “done”
;;
restart)
echo -n “Restarting bandwidth shaping: “
restart
echo “done”
;;
show)
echo “Bandwidth shaping status for $IF:”
show
echo “”
;;
*)
pwd=$(pwd)
echo “Usage: tc.bash {start|stop|restart|show}”
;;
esac
exit 0[/code]
– 실행 권한을 주고 실행해 봅니다.
[code]$ chmod 755 /etc/init.d/shaping
$ /etc/init.d/shaping start[/code]
3) 결과 확인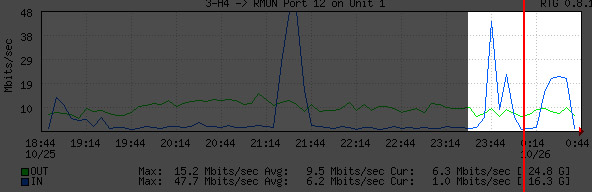
– 기존의 경우 엄청나게 들쭉 날쭉한 것을 알 수 있습니다.
– 오른쪽의 경우 강제로 제한이 걸리면서 둥글게 트래픽이 뭉개지는 것을 볼 수 있습니다.
– 제한을 건 속도에 정확하게 제한이 걸리는것으로 보이지는 않습니다.
– 테스트를 거치면서 IDC상황에 맞게 설정하시면 될것 같습니다.
참고 : http://www.topwebhosts.org/tools/traffic-control.php