![]()
기존의 HTTP(HyperText Transfer Protocol)과 다르게 HTTPS(Hypertext Transfer Protocol over Secure Socket Layer)는 SSL위에서 돌아가는 HTTP의 평문 전송 대신에 암호화된 통신을 하는 프로토콜입니다.
이런 HTTPS를 통신을 서버에서 구현하기 위해서는 신뢰할 수 있는 상위 기업이 발급한 인증서가 필요로 한데 이런 발급 기관을 CA(Certificate authority)라고 합니다. 하지만 이러한 기업의 인증서를 발급받는것은 무료가 아니며 단순히 모바일앱과의 통신이라던가 테스트 목적에서 발급을 받기에는 부담스러운 부분이 있을 수 있습니다.
이런 경우 자체적으로 인증서를 발급하여 사용하는 방법을 고려해 볼 수 있습니다. 이 경우 브라우저 접속시에 보안 경고가 발생하므로 주의하시기 바랍니다. 이 글에서는 CentOS와 Apache 웹서버 구동 환경에서의 HTTPS 구축하는 방법을 정리해 보겠습니다.
# yum install openssl mod_ssl
우선 위와 같이 openssl과 mod_ssl을 설치해줍니다. 만약 설치가 되어있는 상태라면 무시해도 됩니다. 이번엔 다음과 같은 명령을 사용하여 인증서를 생성해 줍니다.
(선택 1) 한번에 원하는 인증서를 발급하기
따로 원하는 CA를 둘것없이 간편하게 서버에서 사용할 인증서를 발급하는 방법은 다음과 같습니다.
# openssl req -x509 -nodes -days 365 -newkey rsa:2048 -keyout /etc/ssl/certs/mycert.key -out /etc/ssl/certs/mycert.crt
Generating a 2048 bit RSA private key
........................+++
writing new private key to '/etc/ssl/certs/mycert.key'
-----
You are about to be asked to enter information that will be incorporated
into your certificate request.
What you are about to enter is what is called a Distinguished Name or a DN.
There are quite a few fields but you can leave some blank
For some fields there will be a default value,
If you enter '.', the field will be left blank.
-----
Country Name (2 letter code) [XX]:KR
State or Province Name (full name) []:Gyeonggi-do
Locality Name (eg, city) [Default City]:Seongnam-si
Organization Name (eg, company) [Default Company Ltd]:TheEye Company
Organizational Unit Name (eg, section) []:
Common Name (eg, your name or your server's hostname) []:
Email Address []:
(선택 2) 자체 CA 인증서를 생성하고 이를 통해 인증서를 발급하기
자체적으로 CA를 구축하는 방법도 있습니다. 세상 누구도 알아주지 않겠지만 다양한 서비스를 동시에 운영중이라면 해볼만한 시도라고 생각이 됩니다. 우선 CA 인증서부터 발급합니다.
# openssl genrsa -out /etc/ssl/certs/rootCA.key 2048
Generating RSA private key, 2048 bit long modulus
......................................................+++
..........+++
e is 65537 (0x10001)

# openssl req -x509 -new -nodes -key /etc/ssl/certs/rootCA.key -days 365 -out /etc/ssl/certs/rootCA.crt
You are about to be asked to enter information that will be incorporated
into your certificate request.
What you are about to enter is what is called a Distinguished Name or a DN.
There are quite a few fields but you can leave some blank
For some fields there will be a default value,
If you enter '.', the field will be left blank.
-----
Country Name (2 letter code) [XX]:KR
State or Province Name (full name) []:Gyeonggi-do
Locality Name (eg, city) [Default City]:Seongnam-si
Organization Name (eg, company) [Default Company Ltd]:Theeye Company
Organizational Unit Name (eg, section) []:
Common Name (eg, your name or your server's hostname) []:
Email Address []:
이번엔 CA에 인증서 발급을 요청하기 위한 CSR(Certificate Signing Request)를 생성합니다.
# openssl genrsa -out /etc/ssl/certs/mycert.key 2048
Generating RSA private key, 2048 bit long modulus
........+++
..........................+++
e is 65537 (0x10001)

# openssl req -new -key /etc/ssl/certs/mycert.key -out /etc/ssl/certs/mycert.csr
You are about to be asked to enter information that will be incorporated
into your certificate request.
What you are about to enter is what is called a Distinguished Name or a DN.
There are quite a few fields but you can leave some blank
For some fields there will be a default value,
If you enter '.', the field will be left blank.
-----
Country Name (2 letter code) [XX]:KR
State or Province Name (full name) []:Gyeonggi-do
Locality Name (eg, city) [Default City]:Seongnam-si
Organization Name (eg, company) [Default Company Ltd]:TheEye Company
Organizational Unit Name (eg, section) []:
Common Name (eg, your name or your server's hostname) []:
Email Address []:

Please enter the following 'extra' attributes
to be sent with your certificate request
A challenge password []:
An optional company name []:
이번엔 마지막으로 CA 인증서와 CSR을 이용하여 서비스에 사용할 인증서를 발급해 보도록 하겠습니다.
# openssl x509 -req -in /etc/ssl/certs/mycert.csr -CA /etc/ssl/certs/rootCA.crt -CAkey /etc/ssl/certs/rootCA.key -CAcreateserial -out /etc/ssl/certs/mycert.crt -days 365
Signature ok
subject=/C=KR/ST=Gyeonggi-do/L=Seongnam-si/O=TheEye Company
Getting CA Private Key
아파치 웹서버 설정에 적용
이제 /etc/ssl/certs 디렉토리에 mycert.key 파일과 mycert.crt 파일이 생성되었습니다. 이제 Apache 설정에 다음과 같은 형태로 이 키를 지정해 줍니다.
LoadModule ssl_module modules/mod_ssl.so

...

<VirtualHost 124.217.198.56:443>
  DocumentRoot /home/theeye/public_html
  ServerName theeye.pe.kr
  SSLEngine on
  SSLCertificateFile /etc/ssl/certs/mycert.crt
  SSLCertificateKeyFile /etc/ssl/certs/mycert.key
</VirtualHost>
이제 Apache 데몬을 재시작 한 뒤 해당 도메인에 https 로 접속하면 다음과 같은 보안 경고가 뜨게 됩니다.
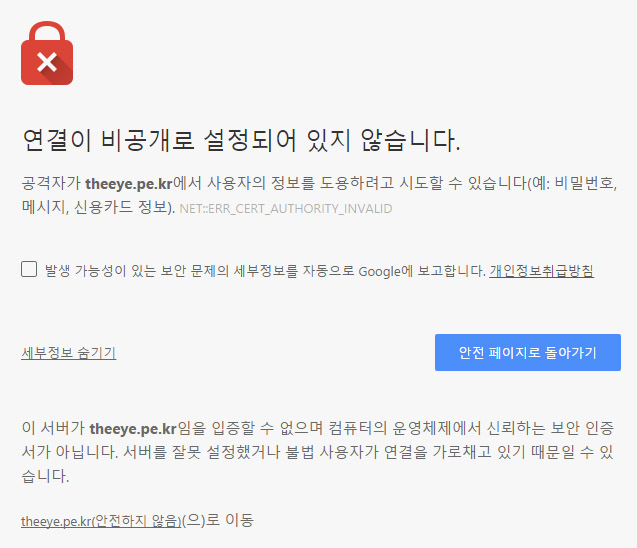
하지만 아래의 안전하지 않음으로 이동을 통해 사이트에 정상적으로 접속하는 것이 가능합니다. 만약 iOS/Android에서 구동되는 어플리케이션의 경우 별도의 처리가 필요할 것입니다.